So, what’s it like using annotations in Tapestry along with complex, cool and ajaxified components?
Well, let’s find out!
Html Template
Assuming that we want our html template to be as clean as possible, our CategoryTree.html file will
look like this:
<body jwcid="@Border" title="Tree Management"> <div id="note" > <h2>Tree Management</h2> <p> <a jwcid="expandAllLink" href="#">Expand All</a> | <a jwcid="collapseAllLink" href="#">Collapse All</a> </p> <div id="treeArea"> <div jwcid="tree" id="tree" style="overflow: auto; width: auto; height: auto;"> <a jwcid="nodeLink" href="folder.png"> <img jwcid="icon" align="absbottom"/> <span jwcid="nodeLabel">Node 1</span> </a> </div> </div> </div> </body> |
This includes 2 links to expand and collapse all nodes and the tree component. Tacos tree component
can be thought of as a smart iteration component (think of For or ForeEach) but it also knows in which
order the (visible) nodes should be rendered and it knows the node depth of each one of them.
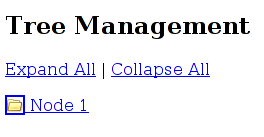
So, here’s how the template looks like if you directly preview it in a browser
 ,
,
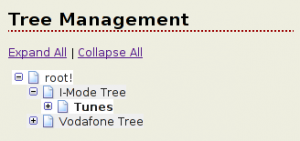
and here how it looks when tapestry renders it
 .
.
Page Class
Ok, now let’s move on to the only other file needed, the CategoryTree.java (we would need a
CategoryTree.jwc if we didn’t use annotations). Here it is:
public abstract class CategoryTree extends BaseCmsPage { @InjectObject("service:mobilecms.categoryService") public abstract CategoryService getCategoryService(); @Bean public abstract EvenOdd getEvenOdd(); @Persist @InitialValue("new java.util.HashSet()") public abstract Set getTreeState(); @Persist public abstract Category getNodeToEdit(); public abstract void setNodeToEdit(Category node); @Component(type="tacos:Tree", bindings={"contentProvider=contentProvider", "keyProvider=keyProvider", "state=treeState", "value=current", "rowStyle=bean:evenOdd"} ) public abstract Tree getTree(); @Component(type="DirectLink", bindings={"listener=listener:editNode", "parameters={current.id, current.name}"} ) public abstract DirectLink getNodeLink(); @Component(type="DirectLink", bindings={"listener=listener:collapseAll"} ) public abstract DirectLink getCollapseAllLink(); @Component(type="DirectLink", bindings={"listener=listener:expandAll"} ) public abstract DirectLink getExpandAllLink(); @Component(type="Insert", bindings={"value=current.langName", "class=(nodeToEdit!=null and current.id == nodeToEdit.id) ? 'selected' : null"} ) public abstract Insert getNodeLabel(); public abstract Category getCurrent(); public IKeyProvider getKeyProvider() { return new CategoryKeyProvider(); } public ITreeContentProvider getContentProvider() { return new CategoryTreeContentProvider(getCategoryService()); } public void editNode(String id, String name) { setNodeToEdit(new Category(id, name, null, null)); } public void collapseAll() { getTreeManager().collapseAll(); } public void expandAll() { getTreeManager().expandAll(); } public ITreeManager getTreeManager() { return new TreeManager(getTreeState(), getContentProvider(), getKeyProvider()); } |
Ok, so I lied (a bit). You still need a few extra classes to run this (i.e. your domain model)
but that’s obvious! Here, we make use of Category (our bean), CategoryService (our way of
finding Categories) and trivial implementations of IKeyProvider and ITreeContentProvider
(the tree’s way of accessing data).
Annotations Used
Now, from top to bottom, here are the annotations explained:
- @InjectObject: Inject the specified object-service in our class, simple and powerful. Services
are defined using Hivemind or Spring -the one used here is a singleton. - @Bean: Create (and inject) a simple javabean. The bean is constructed on each render. We use this
to achieve alternate coloring of each tree’s node. - @Persist: Store / remembers the value of the property across multiple renders. Uses session by default.
- @InitialValue: We don’t want that property to be null at the beggining, and we’re lazy to write java
code to do this, so we simply add this annotation. - @Component: This one defines the components that are used in this page. In 4.1.1+ versions of Tapestry
the type attribute can be deduced by the framework if it matched the return type of the annotated method.
The id of each component is not specified since the framework uses by default the related property name,
i.e. getNodeLink() is for id nodeLink. This leaves us with the bindings attribute which i find quite
easy to follow.
From then on, the code contains 6 more methods, all one-liners! Notice how easy it is to collapse or
expand all nodes, and how we add a specific style to the selected node (tip: see the bindings of
getNodeLabel() and the editNode() method).
Ajax Included???
Oh, and BTW, the tree you’ve just created is AJAX enabled! Clicking to expand or collapse a node will
result in only the tree refreshing. You’ll have to add a “nodeLinkAjax=false” to have normal, old-style
refreshes (http://tacos.sourceforge.net/components/Tree.html).
Hope you liked this annotations and tree tour! I’ll soon get back with some entries on Tapestry 4.1.1
new goodies. Always have fun!